
Your Scissors' Journey - Part 2
Have you ever wondered what your scissors have gone through to reach your hands? We have been using the same process to craft our scissors since 1990 and we pride ourselves on working with mastercraftspeople to make them. In the second part of this journey, we want to give you some insight into the grinding, polishing and sharpening processes.
Disclaimer: all manufacturers are different and have their own specific methods and preferences, varying from the type of metal(s) they use, temperatures, and machines, for example. There are similarities across all methods, though they vary from business to business. The process we’ll be talking about through this series will be about our carbon steel scissors, which includes our Midnight Edition Fabric Shears, our Traditional Fabric Shears, and our other carbon steel products.

Grinding
Polishing
The next step is polishing the surface of your scissor, including all sides of the blades and the tip. Polishing needs to be done by hand because, at this stage, your scissor needs to be inspected and adjusted each time it touches the polishing wheel. Polishing is done at this stage to remove any surface scratches, missed burrs, or imperfections. It also gives your scissors’ surface a smooth and uniform look. After polishing, it’s time to apply any applicable coating to the scissor, such as our signature Midnight Edition coating.
Sharpening
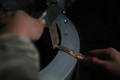
Sharpening comes after polishing and this is the stage when the cutting edge of the blades is created. Up to this point, it would be impossible to try and cut anything with the blades, as they are still completely dull. Sharpening is done by hand to ensure precision, as each scissor has to be sharpened to a specific angle. The angle of the cutting edge is an important part of determining how well the scissor will grab the material when cutting, as well as the smoothness of each cut.

It’s time to answer some age-old questions about sharpening. But first, let’s talk about what’s happening and what’s being considered during the sharpening process. Sharpening takes a lot of skill that is hard to replicate by machines. Every manufacturer has a specific angle that they sharpen the cutting edge to, and, when scissors are being sharpened later in their life, they must be sharpened on this angle! Additionally, the inner parts of the blades, in our case, are not straight, they’re concave (hollow ground). A concave blade decreases friction between the two scissor blades, as well as between the blades and any fabric you’re cutting, resulting in a smoother cut. Excessive and incorrect sharpening has the potential to damage this curve.
So, you may be asking, is it possible to sharpen my scissors at home? We’ve all heard about the aluminum foil and sandpaper tricks, and have seen those small scissor sharpening gadgets. Do those work and do we recommend them? No, and to explain why let’s talk about what foil and sandpaper are and aren’t doing to your scissors when you use them.
What sharpening is doing to your blade is removing a very thin layer of metal on the cutting edge, and to do this you need to use something abrasive. Let’s address aluminum foil first. Foil is not abrasive. If you’ve ever cut through foil with the goal of sharpening your scissors, we’re guessing that they definitely felt better afterwards, and maybe even felt like they were cutting better. What’s happening when you cut through aluminum foil is that it’s actually cleaning your blades, not sharpening them. The foil is removing dust, fibre, and rust (if present) that has built up on the blades, and is also helping to remove very, very small burrs that could be present on the cutting edge. A clean scissor will always feel smooth and cut better, which is why we always recommend cleaning (with a scrap piece of fabric, not with foil!) and oiling your scissors regularly.
On the flip side, sandpaper is abrasive and can actually sharpen scissors. Does that make it an acceptable way to sharpen your scissors? Unfortunately, no. Sandpaper is not smooth and will create burrs, cuts, or uneven edges on your blade. Long term use will also cause the cutting edge of the blades to be altered from the original angle they were sharpened at. So while your scissors may feel sharper, the long term damage is a risk you have to consider. Cutting any material that your fabric scissors are not designed for is also never a good idea. In this case, if you don’t feel sure about what you’re cutting, it’s going to be best to follow your instinct!
Finally, those sharpening gadgets. The long and short of those sharpeners is that they aren’t adjustable, and are likely made to be used with that specific brand’s scissors. If you use them on any scissor whose cutting edge is not the same angle of the device, then all it’s doing is damaging your scissor by altering the cutting edge, and, in the worst cases, can create cuts in your blades.
Is there anything you can do to sharpen your scissors by yourself? There are proper sharpening machines available online, and if you are interested in learning how to sharpen your own scissors (and other tools!) correctly, they are an excellent investment. Besides that, your scissors are best sent to a professional sharpener. Once the burrs have been removed, your scissor will be heated up to a particular degree and will then take a quick bath to make sure it is hardened perfectly.
Coming up in the third, and final part of this blog series, the two halves of your scissor are ready to be put together by our mastercraftspeople!
Our carbon steel collection